Love Crafty Creations!

May God bless the work of your hands! :)


Martha Stewart - American Made 2014 - Nominee Badge


Friday, June 29, 2012

Momma's Bling Bling Cowgirl Boots

My Mom asked me to add bling bling to her cowgirl boots.  A new, fun, crafty project is a challenge so I gave it a whirl. 

Little did I know Mom was giving me her FAVORITE cowgirl boots to play around with...  Now I don't know about where you are from, but here in Texas, we take our boots seriously!  The last thing on earth I wanted to do was mess us Momma's best boots.

It took some time to figure out the process.  For example, what type of glue would hold the bling best, what color of bling, what size of bling, how much space to leave between each, etc.   

Once my plan was worked out and I actually began adding the bling, it didn't take too long.  The hardest part is holding onto the tiny bling and making sure your spacing is even.

Here is the before pic:


 And here is the after pic:


They turned out pretty well considering it was my first boot project.  I am very curious to see how long the bling bling will stay on with normal wear and tear. 

Go ahead, give it a try.  Add some bling bling to your favorite boots!


If you are interested in more crafty ideas, please feel free to follow me on Pinterest, Facebook and/or Twitter for creative ideas, projects and tips.

~ Christi T
Putting God first everyday in every way!
Live, Love, Lead

Crafty creations, projects and tips for everyday needs, gifts, decorating, do it yourself projects, party planning, cooking and more valuable resources and information are free online. I love to share my crafty finds with you. For more free resources and tips follow me on Pinterest, Facebook and/or Twitter.

My website is www.ShopChristi.com. Check it out!

God Bless You! :)


Follow Me on Pinterest

www.ShopChristi.com | Promote Your Page Too


CraftsPerhaps | Promote Your Page Too


Saturday, June 2, 2012

My Dad's Crafty Jesus Plaque

My Grandmother, on my Mom's side, was the very first arts and crafts person to influence me.  I remember her making my baby and toddler clothes, paintings, etc.  She was also a great cook.  My father was a very close second.  My very first memories include going to work with my Dad.  He was a custom cabinet maker.  Custom cabinets, hutches, tables, chairs, desks, you name it and he could make it out of wood.  I remember the smell of saw dust like it was yesterday.

Unfortunately, both my Grandmother and my Father have passed.  Now, fortunately, I am blessed to remember many of the things they taught me as a young child.  One of the things my father taught me how to make, and I still have it, was a Jesus Plaque.


My Dad was a very dedicated Christian man of God.  He raised my brother and I the same way.  As many men of God do, my Father volunteered and dedicated a large majority of his free time to the church.  He was especially fond of working with the Royal Rangers.  The Royal Rangers met every Wednesday night.  Daddy worked with the group my brother participated in so they could spend time together.  The Jesus Plaque was one of the projects he shared with the Royal Rangers.

Daddy included me because he knew I loved to make things.  He provided all the materials and invited the parents to attend as well.  The project required fire so I believe he wanted the extra backup!  LOL

Recently I decided it was time to try the project for myself.  I must say.  The results were awesome.  I ended up making two plaques.  One with a black background and one with a brown background.  The hardest part was burning the pictures in the wind.  The smell was terrible in my craft room so I had to move outside.  Wouldn't you know it, I picked the windiest day possible to begin the project.

Something to keep in mind, after you burn the edges of the Jesus picture, the picture itself is very fragile and will crack easily.  Also, I accidentally touched one of the pictures with a tiny bit of glue and it left a huge white blog.  Lesson learned:  use caution, do not touch your picture with sticky fingers before or after it is burned.  

(*Please Note:  Even though children are mentioned, this project requires adult supervision at all times and is not intended for children to attempt on their own.  In addition, it is wise to keep a wet towel and extra water handy or fire extinguisher close at hand, just in case the fire gets out of control.  It is very easy to drop the picture if it burns too fast.)


The Jesus Plaques look great on a simple stand.  However, just in case, I had the Hubby drill nail holes in the back for hanging.

Taking it one step each day, the project was completed in 4 days.  Not too bad considering I only spent about 30 minutes each day working on it.  Including the picture search and edit time, it took probably three to fours to complete.

The Jesus Plaque my Dad helped me make still hangs in my kitchen right above his picture.  It looks the exact same as it did ... years ago.  (A lady can't give away her age, now can she!)

Thank you Daddy!  You probably never knew what an impact you made on my life with the simple things you taught me.  To this day I love working with wood, any kind of wood.  The smell of saw dust brings back many fond memories and more than likely always will.


If you are interested in more crafty ideas, please feel free to follow me on Pinterest, Facebook and/or Twitter for creative ideas, projects and tips.

~ Christi T
Putting God first everyday in every way!
Live, Love, Lead

Crafty creations, projects and tips for everyday needs, gifts, decorating, do it yourself projects, party planning, cooking and more valuable resources and information are free online. I love to share my crafty finds with you. For more free resources and tips follow me on Pinterest, Facebook and/or Twitter.

My website is www.ShopChristi.com. Check it out!

God Bless You! :)


Follow Me on Pinterest

www.ShopChristi.com | Promote Your Page Too


CraftsPerhaps | Promote Your Page Too


Tuesday, May 8, 2012

Mom's Day


With Mother's Day quickly approaching, it was a must to finish my Mom's gift.  Finished it this morning.  Now, of course, she will read this so I can't tell you what it is or post pics yet.  However, I think I may have to make this gift for myself as well.  Too cute!  I can't wait to share with you all.

What do you plan to make or do for your Mom's day?

I try to come up with something different every year.  It is getting harder and harder since my Mom has EVERYTHING!!!

At this point, we are not sure what the Mom day plans will hold, but I am sure it will be filled with lots of great food and family fun.  Although, all Momma really needs is a kiss and hug from her boys'!

My children are truly a gift from God.  They make every day amazing, unique, fun, challenging and exhausting.  But, oh yes, I cherish being a Mom everyday.  Thanking God daily for my boys' has become a habit, which I hope to keep up for a very long time, if not forever!    

So here is to all you Mom's out there...  Whether your own children are grown, growing or still growing in your belly, Happy Mother's Day to you!  I hope you thank God and cherish your children every day.  In return, may your children bless you with lots of kisses and hugs on Mom's Day and all the days in between!

A new collection of crafty ideas for Mother's Day ideas are available on my Pinterest boards.  If you need some crafty ideas for Mom's day, go to  http://pinterest.com/craftsperhaps/crafty-mother-s-day-ideas/.


If you are interested in more crafty ideas, please feel free to follow me on Pinterest, Facebook and/or Twitter for creative ideas, projects and tips.

~ Christi T
Putting God first everyday in every way!
Live, Love, Lead

Crafty creations, projects and tips for everyday needs, gifts, decorating, do it yourself projects, party planning, cooking and more valuable resources and information are free online. I love to share my crafty finds with you. For more free resources and tips follow me on Pinterest, Facebook and/or Twitter.

My website is www.ShopChristi.com. Check it out!


Follow Me on Pinterest

www.ShopChristi.com | Promote Your Page Too


CraftsPerhaps | Promote Your Page Too


Sunday, May 6, 2012

What's Next...?


Crafty embellishments are next!  I finally finished updating my website.  Many items were removed for a more focused effort.  Party favors, pet supplies and handbags are just a few of the items deleted.  The new focus is on crafty creations, party supplies and personalized gifts.  Crafty embellishments are coming soon!   

I don't know about you but I have found crafty embellishments, bling bling and supplies are way too expensive.  My goal is to provide crafty embellishments at a reasonable price.  I love making them.  Lots of sparkle, glitter and bling bling make me very happy!


Cross iron on patches, sparkling bling bling flowers, glittery butterflies are some of the crafty embellishments I have made so far.


Also planning on adding more crafty creations as well.  Too many ideas and too little time!  This will be a day by day process so please bear with me... 

Go ahead and check out my website, www.ShopChristi.com, and see if you like the changes.  Hopefully, you will find it easier to browse and shop!

Oh yes, and still loving Pinterest!  Awesome site, you ought to check it out if you haven't already.

~ Christi T
Putting God first everyday in every way!
Live, Love, Lead

Crafty creations, projects and tips for everyday needs, gifts, decorating, do it yourself projects, party planning, cooking and more valuable resources and information are free online. I love to share my crafty finds with you. For more free resources and tips follow me on Pinterest, Facebook and/or Twitter.

My website is www.ShopChristi.com. Check it out!


Follow Me on Pinterest

www.ShopChristi.com | Promote Your Page Too


CraftsPerhaps | Promote Your Page Too


Wednesday, April 25, 2012

The Beginning.... Crafty Bling Bling Hats and Visors

My bad.  I've been so busy playing on Pinterest and Facebook, I have failed to update my blog again!  My latest crafty projects have mainly been military hats, baseball hats and visors.

Due to recently teaching myself how to make iron-on and sew-able patches, I've been busy embellishing hats, visors, shoes, boots, shirts, jeans, etc.  The first hat was for myself, the boots were for my Mom, well I think you get the idea.  Now I have started receiving customized order requests!

It is so much fun I simply loose track of time.  Crafty creations are definitely my passion.

The inspiration for my first hat came from a hat I saw at the hospital.  My Mom was having surgery.  Jeremy, my brother, and myself wanted to find Mom a special gift.  We happened upon a jewelry and accessories event.  Several women were selling inexpensive items priced at $1, $2 and up.  Needless to say, it was huge hit with the women, teens and girls.

When I was shopping for Mom, since brother was no help at all, I found the hat!  I stopped in my tracks.  Knew instantly, I had to have one.  Then I found the hats with no embellishments, and thought I can make my own design!  Oh, the joy!

I love making my own crafty creations.  This hat had to be my next crafty creation!  I purchased a pink, vintage, military hat.

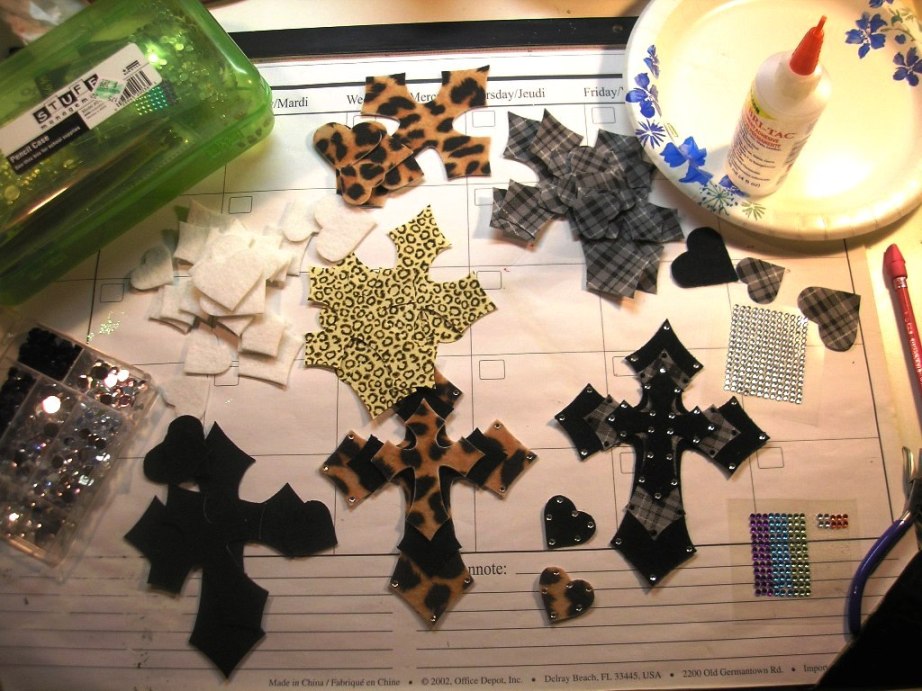
It took two months for me to give up on finding a cross patch I loved on sight.  The search included retail stores, craft stores, online stores, no one had a patch anything close to the one I saw at the hospital.

Then it came to me, make your own!  Off to the Michael's and Hobby Lobby I go.  A few hours later, I have my first cross patch.  I was so excited I made my husband pause his game to check it out.  Of course, he thought I had lost my mind!  However, by the time I finished my hat, he seemed pretty impressed.

So here you go, this is the first hat I embellished with a blue jean cross, my initial c on the side and a heart on the back.  Bling bling is included from front to back for an extra special touch.


Here is a pic of the back...


And then, I decided I needed flip flops to match (with a heart on the back, of course)...


And then my niece wanted a hat...


And then I received my first customized order request...


Now many hats later, this is my latest cross hat design.  It includes more of a 3-D look and stands out beautifully!   The colors were selected for a customized order.  I hope you like it....


And this is the back...


If you would like to see more of my crafty hat and visor creations, there are more pics available on Pinterest.  Have to say, I absolutely LOVE Pinterest!  The link for my Pinterest site is http://pinterest.com/craftsperhaps/ or you can click on the Pinterest link available below.

Due to requests, I started listing the hats and visors for sale on my website.  If you are interested in purchasing a crafty bling bling hat, visor or other customized order, please visit my website at www.ShopChristi.com.  The crafty creations currently available are listed in the Handcrafted category.

If you decide to place an order, please use coupon code: BUYNOW for a 10% discount.  Shipping is currently $7.99 per order (not per item) anywhere in the U.S. except for Hawaii and some parts of Alaska.  (Please note:  Shipping costs will be changing soon due to the increasing price for packing materials and shipping.)

A huge selection of iron on and sew-on patches have built up on my craft table, I will need to list some of them for sale soon!  Future goals include offering crafty embellishments and supplies on the site for your own crafty creations.  Be sure to visit www.ShopChristi.com often for the latest crafty creations and supplies!

If you are more interested in crafty ideas, please feel free to follow me on Pinterest, Facebook and/or Twitter for creative ideas, projects and tips.

~ Christi T
Putting God first everyday in every way!
Live, Love, Lead

Crafty creations, projects and tips for everyday needs, gifts, decorating, do it yourself projects, party planning, cooking and more valuable resources and information are free online. I love to share my crafty finds with you. For more free resources and tips follow me on Pinterest, Facebook and/or Twitter.

My website is www.ShopChristi.com. Check it out!


Follow Me on Pinterest

www.ShopChristi.com | Promote Your Page Too


CraftsPerhaps | Promote Your Page Too


Sunday, December 11, 2011

Pine Cone Fire Starters


Add color and scent to your pine cones for extra special Christmas gifts.  These pine cone fire starters make perfect Christmas gifts for anyone with a wood burning fireplace. You can create a beautiful gift basket or present them as stand alone gifts. 


Materials Needed:

· Pine Cones                                                                                                
 · Coffee Can
 · Epsom Salt
 · Medium Sauce Pan
 · Paraffin Wax (Gulf wax for canning)
 · Crayons
 · Fragrance Oil (Scent of your choice)
 · Tongs
 · Glitter
 · Cooking Spray
 · Muffin Pans
 · Candle wicks 


Instructions:                                                                                              


Soak pine cones in Epsom salt water (1lb of Epsom salt for every gallon of water) for 24 hours. Ice chests work great for soaking a large number of pine cones. Lay the pine cones out on a towel and let them dry completely.
Make sure your coffee can will fit on top of the sauce pan. Begin boiling 1-2 cups of water in medium sauce pan. Just enough to fill about 1/4 of the pan. Place coffee can on top of boiling water (like a homemade double boiler). CAUTION: Be VERY careful while melting and handling the wax.
Carefully begin melting paraffin wax in the coffee can. Be sure to use pot holders or mitts to hold the coffee can as it heats up. Mix in your crayons to create the desired color. Add a little fragrance oil to wax mixture. Once the wax and crayons are completely melted, remove from the heat.
Use tongs to dip pine cones in wax mixture. Dip pine cones several times to coat them thoroughly with wax. Be careful not to coat too thick. Just keep in mind; they will be used in fireplaces. If desired, add glitter to pine cones before wax completely dries.
Coat your muffin pan with cooking spray. Insert candle wick in each muffin pan cup. Pour leftover wax in the muffin pan cups, about 1/3 full. Place pine cones in muffin pan cups to create a bottom for the pine cone to stand up. Place the entire pan of pine cones in the refrigerator to harden. When the wax has completely cooled, remove pine cones from the pan and your pinecone fire starters are ready to use and give!
To give as a gift, simply decorate a gift basket with basket fill or tissue paper. Insert your pine cone fire starters. Embellish the basket with Holiday flowers, berries and ribbon. You will have gift baskets of pine cone starters for great holiday gifts that people will love for their beauty and functionality.
Helpful Tips: 
 · Collect your own pine cones instead of purchasing them. We found over 50 in one, quick walk.
 · Find old, worn out crayons around the house.
 · Save your old coffee cans. Use them to melt the wax in and then recycle it when you’re done.
 · Lay paper (packing paper or newspaper) on your working surface for easy cleanup.
 · Be VERY careful while melting and handling the wax.


Save money, save time and help save our environment. Lots of fun resources are available to help find creative ways to spend quality time with your family while staying on budget. Crafts, decorating, do it yourself projects, parting planning, preparing meals, shopping and more valuable resources and information are free online. I love to share my fun finds with you. For more free resources and tips follow me on Facebook and/or Twitter. My websites are www.CraftsPerhaps.com and www.ShopChristi.com. Check it out!

Monday, December 5, 2011

25 Cheap but Healthy Food Ideas!!!


This article includes very good information regarding ways to feed your family healthy and with affordable foods.  I will definitely be using several of these tips myself!  Loved it this one especially because I love finding new ways to feed my family healthy but yet stay within budget.  Hope you love it too!  Enjoy.

Go to http://shine.yahoo.com/financiallyfit/25-good-cheap-foods-191100917.html
 
Save money, save time and help save our environment. Lots of fun resources are available to help find creative ways to spend quality time with your family while staying on budget. Crafts, decorating, do it yourself projects, parting planning, preparing meals, shopping and more valuable resources and information are free online. I love to share my fun finds with you. For more free resources and tips follow me on Facebook and/or Twitter. My websites are www.ShopChristi.com and www.CraftsPerhaps.com. Check it out!

Friday, December 2, 2011

Every Girl's Dream - Designer Dressing Rooms


Yes, most women will tell you, we simply love our dressing rooms and/or walk-in closets!  If you are one of these women, or perhaps a man with exceptional taste, you will want to check out this link.  This Designer Dressing Room article includes lots of awesome pictures.  You can view Industrial Feminine, Shabby Chic, Contemporary dressing rooms, just to name a few.  The pictures are available at http://interiordec.about.com/od/closetdesign/ig/Designer-Dressing-Rooms/.

Enjoy!

Save money, save time and help save our environment. Lots of fun resources are available to help find creative ways to spend quality time with your family while staying on budget. Crafts, decorating, do it yourself projects, parting planning, preparing meals, shopping and more valuable resources and information are free online. I love to share my fun finds with you. For more free resources and tips follow me on Facebook and/or Twitter. My websites are www.CraftsPerhaps.com and www.ShopChristi.com. Check it out!

Thursday, December 1, 2011

How to Make a Pinata at Home - Really cool idea for parties!

Your children will absolutely love you for this one!  What a fun idea to make your own pinata at home.  No longer do you have to pay top dollar for a pinata with very little, cheap candy in it.  The pinata you make can be filled with your child's favorite candies and you can stuff it with as much candy as it will hold!

For a supplies list and detailed instructions on how to make your own pinata, go to http://www.kids-partycabin.com/make_a_pinata.html.

Hope you find this information helpful!

Save money, save time and help save our environment. Lots of fun resources are available to help find creative ways to spend quality time with your family while staying on budget. Crafts, decorating, do it yourself projects, parting planning, preparing meals, shopping and more valuable resources and information are free online. I love to share my fun finds with you. For more free resources and tips follow me on Facebook and/or Twitter. My websites are www.CraftsPerhaps.com and www.ShopChristi.com. Check them out!

Monday, November 28, 2011

Authentic Egg Roll Recipe - YUMMY!


This is the perfect recipe for any party appetizer!  Simply delicious, they will disappear quickly.  This recipe is brought to you Great Party Recipes.  Give it a try at your next party!  Go to http://www.greatpartyrecipes.com/eggrollrecipe.html.

Save money, save time and help save our environment. Lots of fun resources are available to help find creative ways to spend quality time with your family while staying on budget. Crafts, decorating, do it yourself projects, parting planning, preparing meals, shopping and more valuable resources and information are free online. I love to share my fun finds with you. For more free resources and tips follow me on Facebook and/or Twitter. My website is www.ShopChristi.com. Check it out!