Love Crafty Creations!

May God bless the work of your hands! :)


Martha Stewart - American Made 2014 - Nominee Badge


Friday, May 10, 2013

2 Awesome Italian Chicken Recipes for your Family


My Hubby needed an Italian dish for a pot luck dinner meeting.  Simply could not decide between two recipes, so I decided to make both.

Once cooked, truth be told, I preferred the Chicken Spaghetti.  However, I must say the Chicken Parmesan Casserole was a very close runner up. (Both recipes were found on Pinterest.com.)

Please keep in mind I doubled the Chicken Spaghetti recipe below.  For example, I used 3 large chicken breasts, about 4 cups of shredded chicken, plus x2 the remaining ingredients and put it all in a large casserole dish for baking.    

Warning:  If you do not already have baked chicken ready to go, this recipe will take longer but none the less delish.  :)


Chicken Spaghetti Recipe 


*Note: Pic featured is missing 1 serving.  Chef always gets first dibbs on a new recipe!  LOL  :)

(Doubled the ingredients for a pot luck dinner.  However, if cooking for your family or for the first time you may want to use the original recipe listed below.  The doubled instructions are in parentheses.  It is marvelous served with Italian Garlic Bread!)

2 cups baked/cooked and shredded chicken (Doubled = approx. 3 large chicken breasts or 4 cups.)

     Recipe for baked (cooked) chicken:

     1/2 t. salt 
     1/2 t. pepper
     1/2 t. garlic powder
     1/2 t. onion powder
     1/2 t. paprika
     2-3 T. olive oil

     Mix salt, pepper, garlic powder, onion powder, and paprika in a small bowl.  Cover baking pan with aluminum foil.  Makes it a lot easier to clean up.  Add pounded out chicken breasts to pan and coat w/olive oil using a brush.  Sprinkle seasoning mix over the chicken, then rub in. Add a couple of tablespoons of EVOO to the your frying pan and heat to med-high. When nice and hot, add chicken to the pan (in batches if necessary). Cook chicken on medium-high until juices run clear. (Or you can bake in the oven on 350 for 30 to 40 minutes.  I baked mine for 40 minutes.  They were rather larger pieces.)  Once done, let the chicken rest for 15 to 20 minutes.  This really makes a huge difference.  Once rested, you want to shred your chicken.  

     *Please note: I did NOT double the ingredients for the Baked Chicken spices.  Only the Chicken
     Spaghetti recipe.

3 cups cooked spaghetti  (Doubled = actually used a full box of "Barilla" angel hair pasta)
4 oz. Velveta (or more)     (Doubled but will use more next time!)
1 can cream of chicken soup (Doubled = 2 cans)
1 can green chilies (used 2 cans of Rotel for a spicier version ~ Note: If your family does not like tomatoes, they will prefer the green chilies instead of Rotel.)
1/2 tsp garlic powder (Doubled = 1 tsp.)


*** Before you begin... BEWARE:  If you use Rotel instead of green chilies, it is spicier!  Gives it a very nice kick.  However, some peeps will prefer it without the heat.  In that case, be sure to use the green chilies or leave them out all together.  Remember, most recipes can be tailored to your families preferences and still taste amazing!.

Mix all ingredients together and pour into a greased 9 x 13 pan.  Sprinkle the top with shredded cheddar cheese or your preferred cheese or cheese mix.  Bake at 350 degrees for 30 minutes or until bubbly.

Personally prefer this recipe cold.  However, it is delish hot or cold!   ;) 


And the second, back up, recipe for Hubby is:


Chicken Parmesan Casserole Recipe


*Note: Pic featured is missing 2-3 servings.  Chef and spouse get first dibbs on a new recipe!  LOL  :)

Cubed or whole chicken breasts (Season with salt & pepper.  I used 3 large chicken breasts, cubed and it was more than enough for the casserole.)

EVOO (Extra Virgin Olive Oil) - just a dollop

Minced garlic - smattering or more if you really like garlic

Red pepper flakes (if you do not like spicy, leave this out)

Marinara sauce (Used one jar of "Barilla" marinara sauce.)

Parmesan cheese 

Mozzarella cheese (you will need twice as much mozzarella as Parmesan) 

Italian seasoned croutons (I used 1 package)


In the bottom or your casserole pan, add some olive oil, minced garlic and red pepper flakes, all to taste.  

Per original recipe, "And yes, those are the technical measurements. Use exactly “some.” No more, no less."

Cover chicken with marinara sauce (I used the entire jar.).

Cover the marinara sauce with 2/1 mozzarella to Parmesan ratio.  You can use grated or shredded Parmesan, whichever is your preference. 

Next cover the cheeses with a layer of croutons.

Another layer of 2/1 mozzarella to Parmesan ratio goes on top of croutons.

Bake at 350 degrees for 35 minutes. 


Both recipes turned out DELISH!!!  If you twisted my arm to choose one over the other, I would choose the Chicken Spaghetti.  Due to my Texas upbringing, I tend to prefer the spicier recipes.

Next time, I may add a layer of angel hair pasta to the bottom of the Chicken Parmesan Casserole.  However, the only change for the Chicken Spaghetti is to try the green chilies next time, instead of Rotel.  Hopefully, my boys' will eat a less spicier version.  However, the Hubby disagrees.  He rather likes the spicy version!  LOL.  :)  

Hope you, your family and friends enjoy these recipes for many years to come!


~ Christi T :)
May God bless the work of your hands!


Christi - Haute Crafty Creations


Haute Crafty Creations | Promote Your Page Too


Twitter: https://twitter.com/HauteCrafts

Crafty LOVE Wood Wall Decor w/Lots of Bling


This project began with the purchase a nude wood picture frame from Michael's.  When I purchased it, I had no clue what I would make with it.  However, it quickly became clear, rather than making a picture frame, why not make it into a wall decor statement piece?

Believing in love and kindness, it was obvious... the first wall decor piece would feature the word "Love".  To keep it up to date and eye catching, I went with a black and white zebra theme.  The medium size picture frame was painted black.  I removed the cardboard backing and painted the inside, showing part white.  To keep it simple, I used pre-cut wood letters and painted them black and added bling.  Next, the zebra fabric cross and heart were added.  And last but not least, bling bling was added all around. 

This particular piece was made for a gift.  Super fun to make but even more fun to give it away for someone else to enjoy!


~ Christi T :)
May God bless the work of your hands!


Christi - Haute Crafty Creations


Haute Crafty Creations | Promote Your Page Too


Twitter: https://twitter.com/HauteCrafts

Sunday, May 5, 2013

Glass Container w/Chalk Label and Bling


Recycle your glass jars.  They make great containers for organizing the kitchen, bath and/or bedroom. 

For this project, I used several different jar sizes.  First of all, I painted two sheets of labels, one regular size and one large size with two coats of chalkboard paint.  While those were drying, 2 regular coats of black paint were added to the lids.  Tied a pretty ribbon with a bow around the jar.  Once the lids were dry, added fabric heart patches with bling to match the ribbon.  Last added chalk label to the front of all jars and a smaller chalk label on the back of the larger jars. 

Wa la, a beautiful container with reusable label! 


~ Christi T :)
May God bless the work of your hands!


Christi - Haute Crafty Creations


Haute Crafty Creations | Promote Your Page Too


Twitter: https://twitter.com/HauteCrafts

Sunday, April 7, 2013

Pickle Jar to Black High Heel w/Leopard Fabric Container


Since I have tons of glass pickle jars saved up, I decided it was time to create something cute but useful.  Fabric is in abundance as well.  Why not put the two together and see what we can come up with?

Ended up covering an old pickle jar with animal print fabric plus art and bling bling.  Here is how you can make this craft and/or revise it to your family or friends personal tastes.

Simply use wood glue max to secure the fabric, one side at a time, to the top, inside of glass jar.  When cutting fabric, be sure to leave about an inch extra above the top of the jar.  This will allow you to securely glue down the fabric.  Elmer's Wood Glue Max seems to work best.  It is highly resistant to varying temperatures, etc.

Painted the lid black and added bling bling to the top.  Once the jar is covered in fabric, the lid pretty much becomes a slide on lid, rather than a twist on lid.  Super Cool!

In the long run, the pickle jar becomes an awesome container for toiletries, jewelry, coins, etc.


~ Christi T :)
May God bless the work of your hands!


Christi - Haute Crafty Creations


Haute Crafty Creations | Promote Your Page Too


Twitter: https://twitter.com/HauteCrafts

Saturday, April 6, 2013

Preparing for Craft Booth Grand Opening

Preparing for the craft booth rental "Grand Opening" of Haute Crafty Creations is a challenge.  Too many ideas and too little time!

So far, the crafty creations I already made are priced and ready to go.  Also, finished making new business cards tonight.  Now, I need to make more crafty creations, create signage for the booth, complete my inventory list and make last minute preparations for setting up the booth before 4/15/13!!!  WOW, a lot to take on with a full-time job, hubby and two boys to manage.

As you may know, after 5 years of business, I cancelled my website, www.ShopChristi.com.  It was simply too much stress to keep up with the website, begin a new crafts retail rental space, work full-time and manage my family responsibilities.  This allows me to focus on God first, family second and crafts third... LOL!  Crafty creations are my passion.

If you have not found your passion yet, just keep an eye out for the one thing you love to do and totally loose track of time when you are doing it!  Seriously, I could work on crafts for 24 hours straight and not think twice about it.  I just love it!  Plus it is a true blessing when someone loves what I have made with  my own hands.

After a year on the waiting list, I am super thankful and feel blessed to have this beginner's, open shelving unit space to display my crafts.  You will want to stop by if you are in the area.  I have three years worth of crafts ready to put up for sale.  And, of course, most of them include lots of bling, bling!  The Antique & Craft Mall of Mansfield is located at 920 North Main Street, Mansfield, TX  76063.  They are open 7 days a week, 10 a.m. to 6 p.m.  Website, http://antiquemallofmansfield.com/index.html.


My head is swimming with ideas and not enough time in the day to create them all.  Must end here, I need to get crafty!  Too much too do, too little time...

Will keep you updated on the progress.  As I am "overcoming" all the challenges placed before me with God's help!

~ Christi T :)
May God bless the work of your hands!


Christi - Haute Crafty Creations


Haute Crafty Creations | Promote Your Page Too


Twitter: https://twitter.com/HauteCrafts

Thursday, April 4, 2013

2 Year Work Anniversary & Grand Opening at Craft Mall

Today is my 2 year work anniversary at American Support - Work from Home.  Yeah me!  Love working for AS. Feel blessed to work where I can help people and be at home with my family!  Also looking forward to Grand Opening of my new craft rental space at the Antique & Craft Mall of Mansfield.  Be sure to check back often for lots of crafty updates!  And, as always, thank you so much for your input and support!  :)  

~ Christi T :)
May God bless the work of your hands!


Christi - Haute Crafty Creations


Haute Crafty Creations | Promote Your Page Too


Twitter: https://twitter.com/HauteCrafts

Monday, April 1, 2013

Craft Booth Opening, ShopChristi.com Closing


Well heck, after 5 years, I am officially closing www.ShopChristi.com.  It is time to move forward in a slightly different direction.

Over a year ago, I submitted an application to rent space at the Antique & Craft Mall of Mansfield.  Feeling blessed and happy to let you know, the application was recently reviewed and accepted!  Haute Crafty Creations grand opening will be 4/15/13!

It will be a small, open, shelf unit in the beginning.  However, I believe in God's promises and I know the crafts will sell well and a larger rental space will be available at just the right time.  God is good and his timing is perfect.  No way could I fill up a larger space at this time.

Literally worked all day switching ShopChristi.com to my new craft rental space name "Haute Crafty Creations". Did not realize how many active social media accounts, websites, etc. I have... Very time consuming but will be well worth it in the end! (If you come across a bad link, please let me know. It is very hard to find all the links on these sites.)

REMINDER: ShopChristi.com is no longer available. Most popular items are listed or will be listed on my Etsy and eBay sites.

Thank you very much,
~ Christi T :)
May God bless the work of your hands!


Christi - Haute Crafty Creations


Haute Crafty Creations | Promote Your Page Too


Twitter

Sunday, December 30, 2012

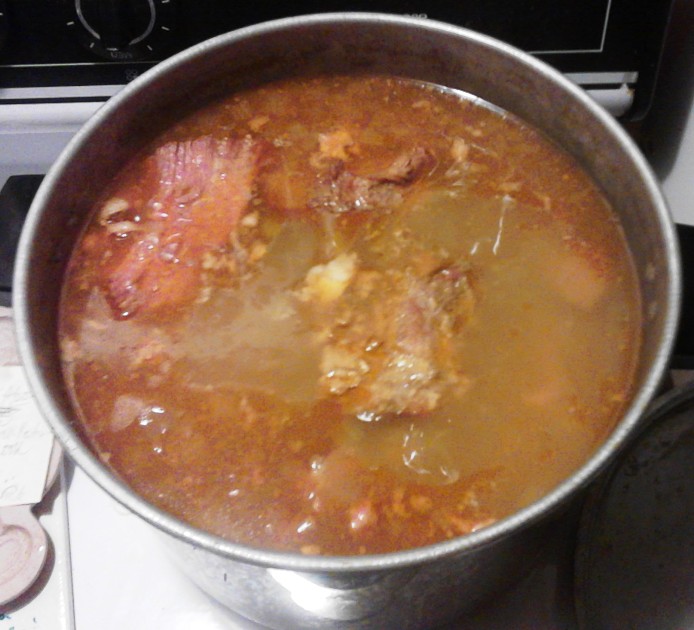
Beans and Ham Recipe – Texas Style


I always wanted to learn how to cook some mean beans and ham.  My Mom makes the absolute BEST!  So of course, I went to her.  With her help, I came up with my own version.  The ingredients and instructions are below.  I don’t think they will ever be as good as Mom’s.  However, they turned out delish! 


HAM Ingredients:

8 – 10lb bone-in ham

1 Tablespoon of yellow mustard seeds or ground mustard

¼ - ½ cup of honey

3 or 4 garlic cloves (minced) or 2 Tablespoons minced garlic from jar

1 Tablespoon onion powder


PINTO BEAN Ingredients:

32 oz. bag of pinto beans

1 large carton of chicken broth

1 large carton of beef broth

2 Tablespoons of chili powder

2 Tablespoons of packed light brown sugar

4 garlic cloves (minced) or 2 Tablespoons minced garlic from jar

1 onion

1 jalapeno

pepper

sea salt


CORNBREAD Ingredients:

2 packages of yellow cornbread mix (requires 2 eggs and 1 1/3 cup of milk)

¼ cup sugar

cooking oil spray

(Also see my Mom’s cornbread recipe below for more ingredient options)


First, prep the pinto beans.  You will need to sort through them for rocks and bad beans. Wash them and then soak them in a large cooking pot of water overnight.  Make sure the water is at least 3 to 4 inches above the beans. 

Next, prepare the ham in a crock pot.  It only takes 4 hours and turns out juicier than in the oven.  Throw the ham in your crock pot with the large side down first.  Trim off as much of the top as needed to fit the lid on the crock pot.  Save the excess ham for other recipes. The ham is pre-cooked so no worries.  I ended up with a few good chunks for omelets, salads, etc.  Just dice it and eat it up! 

Add the spices to your ham: 1 Tablespoon of Yellow mustard seeds or ground mustard, ¼ - ½ cup of honey, 3 or 4 garlic cloves (minced) or 2 Tablespoons minced garlic from jar and 1 Tablespoon onion powder.  .  I just pour it all over the top.  Cook on low for four hours.  After 2 hours, glaze the ham real well with the glaze in the bottom of the crock pot. 

Let the ham cool.  Slice the ham for sandwiches, etc.  Reserve the ham bone, fats and ham chunks for the pinto beans. 

When the ham is done, begin preparing the pinto beans.  Drain and rinse the beans.  Clean your cooking pot.  Add the beans back to the large cooking pot.  Begin adding all of the bean ingredients, except the sea salt:  1 large carton of chicken broth, 1 large carton of beef broth, 2 Tablespoons of chili powder, 2 Tablespoons of packed light brown sugar, 4 garlic cloves (minced) or 2 Tablespoons minced garlic from jar, 1 onion (diced), 1 jalapeno (diced with or without seeds)  and pepper (to taste).  Add the reserved ham bone, fats and ham chunks with any additional water needed to completely cover the beans approximately 2 inches over the top.  Begin cooking the beans on high until they reach a rolling boil.  I let them boil about 10 minutes, then turn it down to low, cover with a lid and simmer for the remaining 3 hours cooking time.  Stir every 30 minutes and make sure you do not need to add any more water. 

When the beans are ready, carefully remove the ham bone.  If there is any remaining ham on the bone, remove it and put it back in the beans.  All of the ham fell right off the bone when I picked it up.  I also removed any excess fat floating on the top, shredded the ham chunks and pieces and stirred it all up. 

To save time, begin making the cornbread thirty minutes before the beans are ready.  Per my Mom, Aunt Jamima Yellow Corn Bread Meal (use recipe on the back and add 6 Tablespoons of sugar, 1 Tablespoon chili powder and /or diced jalapeno) is better.  However, I had two packages of yellow corn bread mix.  Prepared as instructed with ¼ cup of sugar added, it was delicious.  Be sure to oil and preheat your skillet or baking pan for 10 minutes.  It makes a world of difference.       

With the food all prepared, I did not waste any time.  Sat my butt down (at 4am) and ate a huge bowl before I started cleaning up and putting things away.  LOL   A true Southern girl, I LOVE beans and ham!  ENJOY  :) 


If you are more interested in crafty ideas, please feel free to follow me on Pinterest, Facebook and/or Twitter for creative ideas, projects and tips.

~ Christi T 
May God bless the work of your hands!  :)


Crafty creations, projects and tips for everyday needs, gifts, decorating, do it yourself projects, party planning, cooking and more valuable resources and information are free online. I love to share my crafty finds with you. For more free resources and tips follow me on Pinterest, Facebook and/or Twitter.

My website is www.ShopChristi.com. Check it out!

God Bless You! :)


Follow Me on Pinterest

www.ShopChristi.com | Promote Your Page Too


CraftsPerhaps | Promote Your Page Too


Saturday, October 13, 2012

Firewood to Garden Decor Project


Funny how a piece of firewood can turn into a creative project.  While feeding my cat in the backyard, I saw a perfectly shaped piece of firewood.  The hubby keeps a stack ready to go. I simply could not resist.  The creative ideas were flowing.  I grabbed the piece of firewood and started my next craft adventure.

The first step is to make sure the wood is dry and bug free.  This piece was left out to dry on the back porch, inspected and then brought in for painting.


I painted two wood crosses and the wood letters white for some pop.  The popsicle sticks were painted burgundy and then split in half to make the fence.  A couple of popsicle sticks glued to the back will hold it together nicely.  For this project, Elmer's Wood Glue Max worked very well.

After everything was dry, I added rocks to the bottom of the fence.  A couple of little white bows added to the corners and the fence was complete.  It was glued to the bottom on the front.  Next, I added large rocks to both sides at the bottom of the firewood.


Burgundy paint on top helped to tie the colors together.  In at attempt to show more of the color, I painted a drizzle look around the edges. 

Medium size rocks were used to decorate the white crosses.  I glued the crosses near the top on each side.


A little, burgundy bling bling was added to the wooden letters for some sparkle.  The letters were glued to the front, vertically, and it was finished.


Firewood to Garden Decor Project supplies list:

1 piece of firewood (stands up well)
Elmer's Wood Glue Max
Popsicle sticks
2 small wood crosses
wood letters
small, medium and large decorative rocks
2 bows
small bling bling
paint


 If you are more interested in crafty ideas, please feel free to follow me on Pinterest, Facebook and/or Twitter for creative ideas, projects and tips.

~ Christi T :)
Putting God first everyday in every way!


Crafty creations, projects and tips for everyday needs, gifts, decorating, do it yourself projects, party planning, cooking and more valuable resources and information are free online. I love to share my crafty finds with you. For more free resources and tips follow me on Pinterest, Facebook and/or Twitter.

My website is www.ShopChristi.com. Check it out!

May God Bless the Work of Your Hands! :)


Follow Me on Pinterest

www.ShopChristi.com | Promote Your Page Too


CraftsPerhaps | Promote Your Page Too


Sunday, September 16, 2012

Add Bling Bling To Your Favorite Denim Pieces - It Is EASY!

Bling, Bling and more Bling

It is simple to add bling to your favorite denim pieces.  I started with my old, worn out Levi overall shorts and my favorite pair of jeans.

The bling is added with fabric glue.  Fabric glue is a MUST when adding bling bling to any type of fabric.

First, I added bling to my favorite pair of jeans.  The jeans fit great but were lacking in sparkle department.

The bling adds a special, sparkling touch to my old, worn out jean.


Next, I worked on adding bling to my old, fave overall shorts.  They have to be over 17 years old and counting.  (Levi's live up to their name brand!)


My beautiful, niece gave me the idea.  I showed her the bling jeans and she instantly states she wants to do that to her overalls.  Well of course, my head is swimming with ideas now!

It was only a few days later, I began adding bling to my overalls.
 
I want to wear both pieces with many different colors so I kept to a clear/silver bling bling color.  Although, you could certainly go with just about any color bling.


Once your project is complete.  Be sure to wash the bling bling denim or fabric items inside out on delicate and hang dry.  This will help keep the bling intact longer.


If you are interested in more crafty ideas, please feel free to follow me on Pinterest, Facebook and/or Twitter for creative ideas, projects and tips.

~ Christi T :)
Putting God first everyday in every way!

My website is www.ShopChristi.com. Check it out!

God Bless You! :)


Follow Me on Pinterest

www.ShopChristi.com | Promote Your Page Too


CraftsPerhaps | Promote Your Page Too